This tutorial will show you how to integrate Spring Security into a Spring MVC application using purely Java configuration. The application won’t use a database, the user credentials are just defined as plain text in the configuration class for simplicity.
We will show you almost all of the files needed for the working application, but will only describe the parts that are strictly connected to the Spring Security integration and not just there to have a basic webapp up and running.
At the end of the tutorial you can download the whole working Maven project.
Tools used:
- Spring Tool Suite 3.7.1.RELEASE
- Apache Maven 3.3.9
- Java 8
- Tomcat 8.0.32
Looking for an XML configuration solution?
We have a similar article that uses XML configuration.
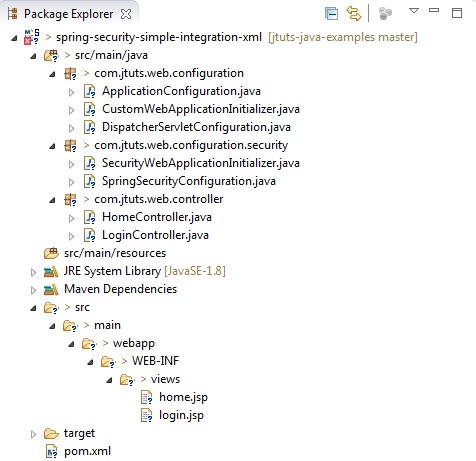
The project structure
Here is the final structure of the project:
Dependencies
Aside from Spring that we are using to build our webapp, we need two Spring Security related dependencies:
<project xmlns="http://maven.apache.org/POM/4.0.0" xmlns:xsi="http://www.w3.org/2001/XMLSchema-instance"
    xsi:schemaLocation="http://maven.apache.org/POM/4.0.0 http://maven.apache.org/xsd/maven-4.0.0.xsd">

    <modelVersion>4.0.0</modelVersion>
    <groupId>jtuts</groupId>
    <artifactId>jtuts-spring-security-java-config</artifactId>
    <version>0.0.1-SNAPSHOT</version>
    <packaging>war</packaging>
    <name>jtuts-spring-security-java-config</name>

    <properties>

        <!-- Dependency versions -->

        <spring.version>4.2.5.RELEASE</spring.version>
        <spring.security.version>4.0.4.RELEASE</spring.security.version>

        <servlet.api.version>3.1.0</servlet.api.version>
        <jsp.version>2.0</jsp.version>

        <!-- Plugin versions -->

        <maven.compiler.plugin.version>3.5.1</maven.compiler.plugin.version>

        <!-- Misc versions -->

        <java.version>1.8</java.version>

    </properties>

    <dependencies>

        <dependency>
            <groupId>org.springframework</groupId>
            <artifactId>spring-webmvc</artifactId>
            <version>${spring.version}</version>
        </dependency>

        <dependency>
            <groupId>org.springframework.security</groupId>
            <artifactId>spring-security-web</artifactId>
            <version>${spring.security.version}</version>
        </dependency>

        <dependency>
            <groupId>org.springframework.security</groupId>
            <artifactId>spring-security-config</artifactId>
            <version>${spring.security.version}</version>
        </dependency>

        <dependency>
            <groupId>javax.servlet</groupId>
            <artifactId>javax.servlet-api</artifactId>
            <version>${servlet.api.version}</version>
            <scope>provided</scope>
        </dependency>

        <dependency>
            <groupId>javax.servlet</groupId>
            <artifactId>jsp-api</artifactId>
            <version>${jsp.version}</version>
            <scope>provided</scope>
        </dependency>

    </dependencies>

    <build>
        <finalName>jtuts-spring-security-java-config</finalName>
        <plugins>
            <plugin>
                <groupId>org.apache.maven.plugins</groupId>
                <artifactId>maven-compiler-plugin</artifactId>
                <version>${maven.compiler.plugin.version}</version>
                <configuration>
                    <source>${java.version}</source>
                    <target>${java.version}</target>
                </configuration>
            </plugin>
            <plugin>
                <groupId>org.apache.maven.plugins</groupId>
                <artifactId>maven-war-plugin</artifactId>
                <configuration>
                    <failOnMissingWebXml>false</failOnMissingWebXml>
                </configuration>
            </plugin>
        </plugins>

    </build>

</project>
The important things to note here:
- spring-security-web: Contains filters and related web-security infrastructure code. You’ll need it if you require Spring Security web authentication services and URL-based access-control. This also pulls in the spring-security-core dependency.
- spring-security-config: Contains the security namespace parsing code. You need it if you are using the Spring Security XML namespace for configuration.
We also needed to set the failOnMissingWebXml property to false, because by default STS would report an error that we don’t have a web.xml.
The springSecurityFilterChain filter
One of the core elements of Spring Security is a chain of filters that determine if the user has access to a given resource. If we are using Java configuration, setting this up is really easy, we just have to create a class extending the AbstractSecurityWebApplicationInitializer class.
package com.jtuts.web.configuration.security;

import org.springframework.security.web.context.AbstractSecurityWebApplicationInitializer;

public class SecurityWebApplicationInitializer extends AbstractSecurityWebApplicationInitializer {

}
It will configure the filter in a way that is equivalent to setting it up in the web.xml like this:
<filter>
  <filter-name>springSecurityFilterChain</filter-name>
  <filter-class>
    org.springframework.web.filter.DelegatingFilterProxy
  </filter-class>
</filter>

<filter-mapping>
  <filter-name>springSecurityFilterChain</filter-name>
  <url-pattern>/*</url-pattern>
  <dispatcher>ERROR</dispatcher>
  <dispatcher>REQUEST</dispatcher>
</filter-mapping>
Creating the configuration class for Spring Security
Most of the configuration goes into our SpringSecurityConfiguration class:
package com.jtuts.web.configuration.security;

import org.springframework.beans.factory.annotation.Autowired;
import org.springframework.context.annotation.Configuration;
import org.springframework.security.config.annotation.authentication.builders.AuthenticationManagerBuilder;
import org.springframework.security.config.annotation.web.builders.HttpSecurity;
import org.springframework.security.config.annotation.web.configuration.EnableWebSecurity;
import org.springframework.security.config.annotation.web.configuration.WebSecurityConfigurerAdapter;

@Configuration
@EnableWebSecurity
public class SpringSecurityConfiguration extends WebSecurityConfigurerAdapter {

    @Autowired
    public void configureGlobal(AuthenticationManagerBuilder auth) throws Exception {
        auth.inMemoryAuthentication().withUser("admin").password("Secret123").roles("USER");
    }

    @Override
    protected void configure(HttpSecurity http) throws Exception {

        http.authorizeRequests()
            .antMatchers("/login").access("permitAll")
            .antMatchers("/**").access("hasRole('ROLE_USER')")
        .and().formLogin()
            .loginPage("/login")
            .defaultSuccessUrl("/home")
            .failureUrl("/login?error=true")
        .and().logout()
            .logoutSuccessUrl("/login");
    }

}
Let’s see in detail the meaning of this code:
- The
@Configurationannotation is needed so that Spring knows that this class may be processed by the Spring container to generate bean definitions and service requests for those beans at runtime. - The
@EnableWebSecurityannotation means that security configuration is configured in this class. - In the
configureGlobalmethod we define a dummy user, that is only stored in memory for the sake of simplicity. - In the
configuremethod we set the following:- The
/loginURL is accessible to anyone, but all other URLs are just for those having theUSERrole. - We use a form for login, it’s URL is
/login, and if the login successful we redirect to/homeand if it is unsuccessful, we redirect to/login?error=true. - When the user logs out successfully, we redirect them to
/login.
- The
This configuration is imported in the main application configuration:
package com.jtuts.web.configuration;

import org.springframework.context.annotation.Configuration;
import org.springframework.context.annotation.Import;
import org.springframework.web.servlet.config.annotation.EnableWebMvc;
import org.springframework.web.servlet.config.annotation.WebMvcConfigurerAdapter;

import com.jtuts.web.configuration.security.SpringSecurityConfiguration;

@EnableWebMvc
@Configuration
@Import(SpringSecurityConfiguration.class)
public class ApplicationConfiguration extends WebMvcConfigurerAdapter  {

}
The login form
The view file for the login form is login.jsp:
<%@ page language="java" contentType="text/html; charset=UTF-8"%>
<!DOCTYPE html>
<html>
<head>
<meta charset="utf-8">
<title>JTuts Spring Security integration tutorial with XML configuration</title>
</head>
<body>
    <h1>Login</h1>

    <form action="${pageContext.request.contextPath}/login" method="POST">
        <table>
            <tr>
                <td><label for="username">Username:</label></td>
                <td><input type="text" name="username"></td>
            </tr>
            <tr>
                <td><label for="password">Password:</label></td>
                <td><input type="password" name="password" /></td>
            </tr>
            <tr>
                <td><input type="submit" value="Login" /></td>
            </tr>
        </table>
        <input type="hidden" name="${_csrf.parameterName}" value="${_csrf.token}"/>
    </form>
</body>
</html>
The important things to note here are the following:
- The URL where we post the form (/login) is the default URL in Spring Security 4.
- The names of the fields (username, password) are also the default names expected by Spring Security.
- The hidden field is there because CSRF protection is enabled by default and we need a token to be able to submit the form.
Warning: In earlier versions of Spring Security the defaults mentioned could be different, so please pay attention to that if you are on an older version.
Other files
We don’t have a web XML so we use a WebApplicationInitializer to configure the application:
package com.jtuts.web.configuration;

import javax.servlet.ServletContext;
import javax.servlet.ServletRegistration;

import org.springframework.web.WebApplicationInitializer;
import org.springframework.web.context.ContextLoaderListener;
import org.springframework.web.context.support.AnnotationConfigWebApplicationContext;
import org.springframework.web.servlet.DispatcherServlet;

public class CustomWebApplicationInitializer implements WebApplicationInitializer {

    @Override
    public void onStartup(ServletContext container) {

        // Create the 'root' Spring application context
        AnnotationConfigWebApplicationContext rootContext = new AnnotationConfigWebApplicationContext();
        rootContext.register(ApplicationConfiguration.class);

        // Manage the lifecycle of the root application context
        container.addListener(new ContextLoaderListener(rootContext));

        // Create the dispatcher servlet's Spring application context
        AnnotationConfigWebApplicationContext dispatcherContext = new AnnotationConfigWebApplicationContext();
        dispatcherContext.register(DispatcherServletConfiguration.class);

        // Register and map the dispatcher servlet
        ServletRegistration.Dynamic dispatcher = container.addServlet("dispatcher", new DispatcherServlet(dispatcherContext));

        dispatcher.setLoadOnStartup(1);
        dispatcher.addMapping("/");
    }
}
We also have a configuration file for the dispatcher servlet, that just sets up a view resolver and the packages to scan for components:
package com.jtuts.web.configuration;

import org.springframework.context.annotation.Bean;
import org.springframework.context.annotation.ComponentScan;
import org.springframework.context.annotation.Configuration;
import org.springframework.web.servlet.ViewResolver;
import org.springframework.web.servlet.view.InternalResourceViewResolver;

@Configuration
@ComponentScan(basePackages = "com.jtuts.web")
public class DispatcherServletConfiguration {

    @Bean
    ViewResolver setupViewResolver(){
        InternalResourceViewResolver resolver = new InternalResourceViewResolver();

        resolver.setPrefix("/WEB-INF/views/");
        resolver.setSuffix(".jsp");

        return resolver;
    }

}
Other then the code I showed you, we have a very simple view file for the home page. And also two basic ontrollers for the home and login page.
Result
When you deploy the project to a Tomcat 8, you get a simple login form and when you log in with the right credentials it redirects you the the home page.

Download
You can download the working project from here.

