This tutorial describes how to create a simple Spring MVC web application statring from a basic Maven project. We set up the required directories and files by hand, almost nothing will be pre-generated. For configuration we use only java classes and no XML files (except for the pom.xml for Maven, of course).
Tools used:
- Spring Tool Suite 3.7.3.RELEASE
- Apache Maven 3.3.9
- Java 8 (Update 60)
- Tomcat 8.0.32
Looking for an XML configuration solution?
We have an article on that as well. You can check it out here: Creating a Spring MVC Maven web application from scratch.
Creating the Maven project
- In STS press Ctrl + N, this brings up the New wizard where you select what kind of project or file you would like to create. In the search box enter maven. From the filtered list select Maven Project.
- Click Next.
- Check the Create a simple project (skip archetype selection) checkbox.
- Click Next.
- Set the following properties:
- Group Id: com.jtuts
- Artifact Id: spring-mvc-maven-webapp-with-java-config-from-scratch
- Packaging: war
- Name: spring-mvc-maven-webapp-with-java-config-from-scratch
- Click Finish.
Of course the Group Id, Artifact Id and Name properties can be set to anything else, these are just example values. However the war value for the Packaging is mandatory, because we are creating a web application and the server which will run it (in our case Tomcat) expects a .war file.
The directory structure
STS will automatically create the basic directory structure for our application. This conforms to the basic structure that Maven expects. You can find more information about it on Maven’s Introduction to the Standard Directory Layout page.
The most important directories for us are:
- src/main/java: Java source files.
- src/main/resources: Other resources like property files and xml files.
- src/main/webapp: Web application source files (e.g. JPSs, images, CSS files).
- src/test/java: Test source files.
- src/test/resources: Resources for tests.
By default, Maven expects you to have the above mentioned files in these directories. You can change this in Maven’s pom.xml but you should avoid it not to create confusion when other developers look at your project.
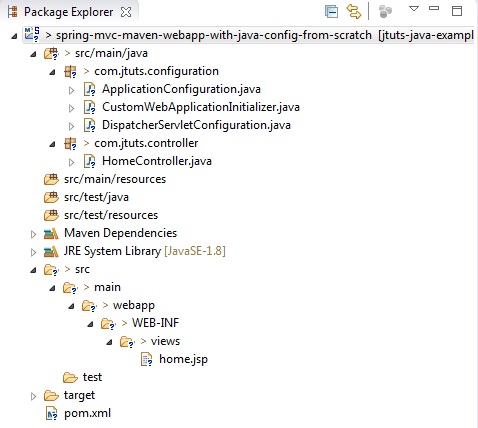
Here is what our final directory structure will look like:
The pom.xml
The pom.xml file is added automatically by STS when you create the Maven project. However, we made some additions that are needed for our webapp to work. This is what the final pom.xml looks like:
<?xml version="1.0" encoding="UTF-8"?>
<project xmlns="http://maven.apache.org/POM/4.0.0" xmlns:xsi="http://www.w3.org/2001/XMLSchema-instance"
    xsi:schemaLocation="http://maven.apache.org/POM/4.0.0 http://maven.apache.org/xsd/maven-4.0.0.xsd">
    <modelVersion>4.0.0</modelVersion>
    <groupId>com.jtuts</groupId>
    <artifactId>spring-mvc-maven-webapp-with-java-config-from-scratch</artifactId>
    <version>0.0.1-SNAPSHOT</version>
    <packaging>war</packaging>
    <name>spring-mvc-maven-webapp-with-java-config-from-scratch</name>

    <properties>

        <!-- Dependency versions -->

        <spring.version>4.2.5.RELEASE</spring.version>
        <servlet.api.version>3.1.0</servlet.api.version>

        <!-- Plugin versions -->

        <maven.compiler.plugin.version>3.5.1</maven.compiler.plugin.version>

        <!-- Misc versions -->

        <java.version>1.8</java.version>

    </properties>

    <dependencies>
        <dependency>
            <groupId>org.springframework</groupId>
            <artifactId>spring-webmvc</artifactId>
            <version>${spring.version}</version>
        </dependency>

        <dependency>
            <groupId>javax.servlet</groupId>
            <artifactId>javax.servlet-api</artifactId>
            <version>${servlet.api.version}</version>
            <scope>provided</scope>
        </dependency>

    </dependencies>

    <build>
        <finalName>spring-mvc-maven-webapp-with-java-config-from-scratch</finalName>
        <plugins>
            <plugin>
                <groupId>org.apache.maven.plugins</groupId>
                <artifactId>maven-compiler-plugin</artifactId>
                <version>${maven.compiler.plugin.version}</version>
                <configuration>
                    <source>${java.version}</source>
                    <target>${java.version}</target>
                </configuration>
            </plugin>
            <plugin>
                <groupId>org.apache.maven.plugins</groupId>
                <artifactId>maven-war-plugin</artifactId>
                <configuration>
                    <failOnMissingWebXml>false</failOnMissingWebXml>
                </configuration>
            </plugin>
        </plugins>
    </build>

</project>
In this file we include all the dependencies that are required by our example project:
- The
spring-mvcdependency will include all Spring related functionality. - The
javax.servlet-apidepencdecy contains the interfaces and classes that enables us to use servlets in our application.
The finalName will be the name of the .war file that is created.
Then, we have two plugins:
- The
maven-compiler-pluginconfigures the compilation process of Maven. In this case we set that our source code must be compatible with at least Java 1.8, and we want our compiled program to be executable with Java 1.8 and above. - The
maven-war-pluginis just there to set thefailOnMissingWebXmlproperty to false, because otherwise STS would report an error that we don’t have aweb.xml.
Creating our application initializer class
Our application needs a point of entry where it’s startup process begins. We set up an application initializer class for this purpose. In case of Java config we don’t have a web.xml, so we need to define the application initializtion related stuff in a class. A class, that implements the WebApplicationInitializer interface, and Spring will call it’s onStartup method, when starting up the application. We create this, and further configuration classes in the com.jtuts.configuration package.
package com.jtuts.configuration;

import javax.servlet.ServletContext;
import javax.servlet.ServletException;
import javax.servlet.ServletRegistration;

import org.springframework.web.WebApplicationInitializer;
import org.springframework.web.context.ContextLoaderListener;
import org.springframework.web.context.support.AnnotationConfigWebApplicationContext;
import org.springframework.web.servlet.DispatcherServlet;

public class CustomWebApplicationInitializer implements WebApplicationInitializer {

    @Override
    public void onStartup(ServletContext container) throws ServletException {

        // Create the 'root' Spring application context
        AnnotationConfigWebApplicationContext rootContext = new AnnotationConfigWebApplicationContext();
        rootContext.register(ApplicationConfiguration.class);

        // Manage the lifecycle of the root application context
        container.addListener(new ContextLoaderListener(rootContext));

        // Create the dispatcher servlet's Spring application context
        AnnotationConfigWebApplicationContext dispatcherContext = new AnnotationConfigWebApplicationContext();
        dispatcherContext.register(DispatcherServletConfiguration.class);

        // Register and map the dispatcher servlet
        ServletRegistration.Dynamic dispatcher = container.addServlet("dispatcher", new DispatcherServlet(dispatcherContext));

        dispatcher.setLoadOnStartup(1);
        dispatcher.addMapping("/");
    }
}
In this method we do the following:
- First we create a root
WebApplicationContextfor the application. This application context will contain and manage all the beans defined. We also tell the container the manage the lifecycle of this application context. - In the following lines we create a dispatcher context. Based on this context, we create a servlet called
DispatcherServletand add it to the container. The job of the DispatcherServlet is to take an incoming URL and find the right combination of handlers (generally methods on Controller classes) and views (generally JSPs) that combine to form the page or resource that’s supposed to be found at that location. - Then we set the
loadOnStartupvalue. A value of>=0means that the servlet is loaded when the web-app is deployed or when the server starts. A value< 0means that the servlet is loaded whenever the container feels like. Also, the container must guarantee that servlets marked with lower integers are loaded before servlets marked with higher integers. The container may choose the order of loading of servlets with the sameloadOnStartupvalue. - Finally, we map the
DispatcherServletto the root path (/). This makes it the default servlet, that means, that it will handle all requests that does not match another servlet’s mapping.
This completes the initialization process. But as you might have noticed, we have registered two classes. The ApplicationConfiguration will contain configuration for the application context and the DispatcherServletConfiguration will contain configuration for the dispatcher servlet. Let’s look at them in detail.
The DispatcherServletConfiguration class
package com.jtuts.configuration;

import org.springframework.context.annotation.Bean;
import org.springframework.context.annotation.ComponentScan;
import org.springframework.context.annotation.Configuration;
import org.springframework.web.servlet.ViewResolver;
import org.springframework.web.servlet.config.annotation.EnableWebMvc;
import org.springframework.web.servlet.view.InternalResourceViewResolver;

@Configuration
@EnableWebMvc
@ComponentScan(basePackages = "com.jtuts.controller")
public class DispatcherServletConfiguration {

    @Bean
    ViewResolver setupViewResolver(){
        InternalResourceViewResolver resolver = new InternalResourceViewResolver();

        resolver.setPrefix("/WEB-INF/views/");
        resolver.setSuffix(".jsp");

        return resolver;
    }

}
In this class using the @ComponentScan annotation we configure the location of our Controller beans.
We also set up a view resolver that will determine how to map view names into JSP files. The prefix property’s value will be prepended to the name of every view we request and the suffix property’s value will be appended to the requested view name. For example if our controller returns the view name “login“, it will be mapped to the jsp: “/WEB-INF/views/login.jsp“.
The @EnableWebMvc is the same as the <mvc:annotation-driven /> in the XML version. It enables a couple of spring features like mapping requests to controllers using the @RequestMapping annotation, validating form data with the @Valid annotation and so on.
The ApplicationConfiguration class
package com.jtuts.configuration;

import org.springframework.context.annotation.Configuration;
import org.springframework.web.servlet.config.annotation.WebMvcConfigurerAdapter;

@Configuration
public class ApplicationConfiguration extends WebMvcConfigurerAdapter  {

}
This class will contain the configurations related to the application context. Anything that is not related directly to handling incoming requests. Currently it is empty.
The HomeController class
We have a very simple controller, that is mapped to the /home path, and returns the “home” view name.
package com.jtuts.controller;

import org.springframework.stereotype.Controller;
import org.springframework.web.bind.annotation.RequestMapping;
import org.springframework.web.servlet.ModelAndView;

@Controller
public class HomeController {

    @RequestMapping("home")
    public ModelAndView home() {
        return new ModelAndView("home");
    }

}
The home JSP
We have a very simple JSP for the home page. It only contains some basic content so we know that our application is running fine.
<%@ page language="java" contentType="text/html; charset=UTF-8" %>
<!DOCTYPE html>
<html>
<head>
    <meta charset="utf-8">
    <title>Spring MVC web application from scratch</title>
</head>
<body>
    <h1>Welcome to the home page.</h1>
</body>
</html>
The running application
When you deploy the application to a Tomcat8 server, it will show you the following result if you navigate to the homepage:

To deploy the application to a Tomcat8 server you just have to copy your .war file located in the target folder, into tomcat-installation-path\webapps . Then start up the server by launching startup.bat (windows) or startup.sh (linux).
Download
You can download the working project here.